My Initial Review of the new Tyros 5 on 20/11/2013
Well, I have been to the Dawsons Tyros5 Demo at Altrincham today and seen the latest keyboard offering 'in the flesh' . A big thank you to Chris at Dawsons Music for inviting me along.
The Demonstration was performed very ably by Richard Bower. Have known Richard for quite some years now and we spent over an hour when everyone else had gone discussing the new developments on T5. We even tested a couple of things out on the keyboard that I asked of him. More of that later.
This is certainly no incremental upgrade!
Equipment used: Tyros 5 76 for main Demo using Yamaha DXR12 Powered Monitors. Tyros 5 61 using the new Yamaha speaker set.
Richard started off with a brief Organ World Demo to show the Rotary effects and ease of use whilst playing. Was very short and sweet as he did a more thorough Demo later on in his program. I thought the effects were extremely effective and realisitic.
Next came the piano section. Always a bone of contention with the previous Tyros line. Richard started of with Concert Grand - of course - and followed up with Pop Grand, Upright piano and Honky Tonk. To me they sounded great on the Yamaha DXR12 Speakers. Did not hear them on the 61 key with speakers.
Next on the list were the Audio styles. He started off with the Cool Jazz Club which had a very good blend of RH voices to match the style. It's a style that I would use a lot in my playing. Whilst playing styles at any time I took particular attention to the style to OTS balances and they all appeared to be much more balanced than on previous models. Drums are great in the Audio styles but I thought them much more defined in all of the played styles.
The new Right hand Chords and Left hand bass worked very well with pronounced Bass. Great for the pianists amongst us.
String section was one that I paid particular attention to as I just don't like the T4 Strings - Too harsh for me. I talked to Richard about this and he says that these have been reworked with new string samples added, a lovely example was the new 'Romantic Strings'. This is quite prevalent in a lot of style OTS's. On listening I thought this to be correct and more pleasing to the ear.
Something that I was very interested in was the 'Ensemble section' and Richard went through this at length as it is a major new feature. Believe me you will not be disappointed. Yamaha have done a great job on this feature. Everything is as stated on the web. Play one fingered and you get one voice of a quartet, 2 keys and 2 separate instruments playin a corresponding note. Play 4 and you get a full harmonised Quartet, whether in Strings, Brass or other. A little trick here is that the keyboard can be 'fooled' into thinking that 4 fingers are down by simply pressing on the Harmony button. Try it with a Choir and it is stunning! Truly a useful feature on this keyboard.
Lots of new instruments and they all feature on the front page of each section. Flutes and Sax have now been logically merged into one section. This on other sections also but lost that one in my mind. So much to take in. The Guitars are so realistic and quite a few new ones sampled. The Hank Marvin Guitar [ShadowedGuitar] was like the real thing. Lots of other new Guitar samples also. The new Guitars have now been sampled through old Amps and as such they are very authentic sounds which can be altered on screen as you play to include effects, just like with a pedal. Incidentally the FC7 pedal can now be programmed to change effects such as 'Wah Wah' etc.
Each and every style has been revamped to include the new DSP and Reverb effects and sounds. Have to say that every style sampled sounded bright and clear in Richard's capable hands. A style that impressed was the new 'Bond' style - perfect right hand voices.
Organ flutes are now replaced with Organ World which comprises of Vintage, Home [Tabs], Euro, Concert and Theatre. All were very ably demonstrated and nothing too harsh as organs can be. The Theatre Organ sample was created from direct sampling with an original Wurlitzer Organ but not Blackpool Tower.
The Audio Recorder has been simplified to use and slghtly different in that it records directly to Simple audio and when done then asks do you wish to convert to multi.. Much simpler operation..
Some questions I asked on the Audio side of things:
Are new expansion packs in the pipeline. The answer at the moment is 'No' however you can download new versions for T5 of existing software as long a you still have login details.. The transfers will now apparently be transferred via wireless and a dongle is to be provided for this task. Seems like both pc and mac will be catered for.
Can we now play audio wav or mp3 directly from usb? Yes we can. Just assign it to a multipad.
Do we need a Memory module to do this? No.
Can we record Audio styles directly to Audio Recorder and HD. Yes
Can Audio styles be copied to User/HD? We tried this and copied to User but could not be copied to HD. We also went into style recorder and there is a new button to turn Audio on/off. But not sure what this would achieve as the new style eIther way could not be saved to HD . USER only.
Balance between style and OTS better balanced? Imho they appear to be much better from the Demo.
Lan port? No. Wireless is to be used and software from pc or Mac. That is my understanding from what Richard said.
User area is still 6mb in size so unchanged from T4.
My honest opinion for whatever it is worth. I loved the Demonstration and to be totally honest I couldn't find anything that I disliked about it. Then again Richard is one of the best Demonstrators in the world. I can't wait to actually get my hands on one. I did not have the time to actually play one ( too much yakking with Richard) but the 61 key was played very ably from one of the audience through it's new speaker set and it sounded very good and full sounds.
Hope you find my Review helpful and informative. Keith Ball
I'm a self-taught keyboard player and how to play in the way I describe below!
The way forward!
Firstly obtain an EZ Play Music book with Music using the three chords described. C, G and F, Book Shop, Music Store, Library, Friends etc. A good book to start with is: Kenneth Baker Book1 for keyboards.
This will start you off on the very Basics!
Any Music shop will give advice, but remember you want to learn 'arranger keyboards' NOT Piano!'Create' a base to start from. Start by learning the 3 basic chords C, G and F. -
C in inverted form g - c - e.
G in Root g - b -d
F in Root f -a -c AND inverted a -c -f.
The reason for learning the F Chord in two different ways is being ease of play, from C to F and G to F.
You don't need to be distracted whilst playing the left hand,by 'physically' having to lift your left hand to change chords. You need to 'plant' your fingers and slide quickly from chord to chord by using minimal finger and hand movement
My next advice - just play the chords of a simple 3 chord song that you know well, all the way through and sing it in your head (no style) until you are well practiced.
Next - now you are well practiced in the chord structures, you need to know the scales of those chords, the eight notes of each scale. Learn and practice those until you have them off by heart
C - c d e f g a b c
F - f g a bflat c d e f
G - g a b c d e f# g
Now we have to pick up the easy play sheet music. It is advisable to have music with notes printed on or above or on the notes, so that you can pick up the tune and translate it onto the keyboard.
- Mark the notes along the keyboard with a paper strip segmented to each white key and write on the key name c d e and so forth. this then gives the 'bridge' from sheet music to keyboard in your brain.
So slowly follow the notes until you absorb the sounds in relation to the keys and sing the song in your head again. Do this for as long as it takes and gradually build your speed and fluency.
Now we should be at the point where you have learned your basic chord structures and their scales. You have learned how to translate from simple sheet music to keyboard and will recognize the 'tones' of each note.
You have learned the Chord structure of the song, you have learned the Musical notes of the song.
Now you need to co-ordinate your left and right hands together - Timing - Play through your chosen song very slowly playing left hand, right hand and 'sing' it in your head. Once you can do this you will then be able to build up your speed on the song. Don't worry about styles at this point.
Pick out another song in the same chords and learn that the same way. Learn as many as you can using this method and eventually your fingers will drop on the correct notes.
Remember walk before you can run!
Eventually you will be able to add styles, but turn the tempo down and start slowly, then build up your speed until it feels right for the song. Remember 'sing it in your head'
This is JUST my own method of learning, but it worked for me. I was playing simple songs within a few days. My timing might not have been great and some wrong notes ( I still do that now, lol ) but I was 'playing the songs'
I sincerely hope this helps the 'new players' in their efforts to play.
Most of all Music is ''FUN' and not a chore. So, learnt something new? Give yourself a BIG pat on the back.
If you want to learn to play, give my simple guide a go ..I'm not a music teacher but I do believe I have knowledge from my own experience of learning and playing over the last several years.
Last but not least, if you can afford a Teacher to teach you proper fingering, music theory etc, then please do so, but find a teacher that can teach you keyboard skills, not piano skills which is yet another 'ball game'I have to admit I am not a great Music reader, as I can pick up a tune from listening to it and then play from part memory and part written instructions, chords and song lyrics etc. However, If I have to learn a totally new song from music, I can and do. We're all different of course. If you have the patience and aptitude to learn to read then do so as you'll gain an advantage over people like myself who play mostly from memory and partly by ear.
Hope this helps and have ‘Fun’
Download........ A Chord Chart
I think to make a song interesting we need to consider careful use of the Variations available to us on the particular Keyboard. Some have 4, some have only 2…………To use the variations on the Keyboard properly we need to give thought to the ‘Structure’ of the song, the ‘ups and downs’ whether it is the ‘Verse’ or the ‘Chorus’, a Break, the beginning, or the Ending of the song.
How I construct a song!
I generally dislike using ‘canned’ Intro’s, so I usually start in several ways.
1. I play the last few Bars of the song and go on from there
2. I don’t use any Intro at all and just kick straight into the song
4. I use an Intro if it is only very suitable for the song. There is a point to this though. If you use this option then use the same voices in your first variation as those that are in the ‘canned’ Intro. It sounds more ‘natural’ as the two sounds blend together better.
5. I use ‘Custom’ made Styles Balanced to the correct volumes and Voices.
The Registration!
Of course this depends on how you wish the song to be portrayed. I like to ‘Build’ a song to a Climax. I Have a four variation keyboard so I can build from Variation 1 up to Variation 4 quite easily. This obviously changes with every song and practice and patience is required……… I may just use a couple of the Variations depending on that song.
Button 1……… Variation 2 to start for the first Verse,
Button 2 ………Variation 3 for the Chorus
Button 3 ………Variation 3 plus an Extra Voice or perhaps add Left Hand Strings for the Verse
Button 4 ………Variation 3 for a short ‘Break’ used as an Alternative Chorus and improvisation
Button 5 ………Variation 4 for the Finale and Climax to the song. Adding Left hand Strings, Choir of whatever suits the song.
Depends really on what the style can do, but my preference is using Ending 1 as it’s the shortest one. Short and Sweet!
You can of course finish without a Canned Ending. It’s really your choice. If using a Custom Style then use the best Ending there, as it is of course Custom made for the song and will finish it off properly. One point though is use the same voices in the last part of the song as the chosen Ending variation. Sounds more professional imho.
Here we have a Circle of Major Keys. To play the three Major Chords in any given key, choose the Keys immediately before and after the Key chosen....
that is: Play in the key of C then the 2 Major Chords to use would be F & G
The Minor keys associated with Major Keys. Going clockwise Am is related to C. Dm is related to F.
Just follow the circle around to find the relevant Minor key
The minor keys are in relation to the Major (relative major to minor) by either 6 notes up or 3 semitones down...
Intros and Endings
There are many ways to use intros and endings. Sometimes, you may listen to intros and they will inspire a song. Try to listen to major and minor keys. Use also intros that are not 'fixed', meaning the ones that you can add chords to, because often the intro does not fit with the idea you may have or the chords progression does not correspond to the feeling. Listen to the intros and see how many songs you can think of for that particular intro. " Intros & endings " can also be used part way through tunes as "bridges" (if using an "ending" .......press a variation button just before the "end" & the rhythm will continue ).
Also, it is possible to alter voices (& tempo ) to fit different tunes. You may wish to mute the parts which are not required...and whatever you do....enjoy your music ! Keep pressing buttons (& notes ) and see what happens ! CV./HD.
Another "trick" to check out is changing the tempo of a style. Making Fast styles Slow or Slow styles Fast is often like hearing a totally different style. Further, if you mute all but, say, the rhythm, bass, and one chord of a style it can also sound quite "different". Don't look at the first chord of the first measure of the song. Look at the LAST chord used in the song. That one usually sounds best. You can mess around and see how you like changes. Do the intro in MINOR instead of major, etc.
Experiment. Press Intro/Ending and just let a few notes play before going back to the main, or press Fillin repeatedly, etc., etc. BG. {Anon}
CHORD PROGRESSION WHEEL FOR ANY KEY and PLAYING BY EAR.
The Professional Musicians and more experienced players may well want to give this a miss but your comments and corrections would be most welcome as I hate to pass on duff information.
I have read much about circles of 5ths and 4ths and chord progressions over the years but always in a disconnected and fragmented manner gleaning a bit from here and a bit from there.
I have recently seen some videos on YouTube that began to turn the light on.
I certainly don’t claim to have invented any of this, only to have gathered together bits and pieces from here and there over the years and on the net into one place in the hope that it may turn a few lights on for those of us that have not had the benefit of any formal music teaching and have struggled along finding out the hard way.
No gimmicky device will ever replace formal teaching, but a few memory aids will do no harm for anyone starting out.
Apart from giving some instant fun and a good way of learning new styles by counting the beats to the next chord change, but progressing in a musically pleasing way.
Before you know it you will be playing a few melody notes over the top .
The examples I have given are in the key of C Major so therefore all the chords are based on the scale of C.
If you use these chords. So as long you stay away from the black notes any note you play in the melody can’t be more than one note away from a good note, so, if you change one note to the left or right of the note that sounds wrong (because its not in the chord you are playing) on the next beat, you can always say it was improvisation, especially if you repeat the mistake next time people will think it was meant to be like that!
Eg. if you are playing an F chord but play a G melody note it won't sound good but any note one to the left or right will be in the F chord, F left and A right, so you only have to move one finger to get a musical sound.
If you are trying to work with sharps and flats when in the key of C you can have to change the Minor chord for its major as none of the chords of the scale of C will have any sharps or flats in them.
EG: Let’s suppose we want a G# not a G in the melody, we need to find a chord that contains a G# so try changing Em to E Maj and straight away we get a chord G# B E = E Maj where as Em = G E B.
However, I will leave that to the more professional teachers to explain along with why I didn’t use the B chord in all this.
So, if you are just starting out and new to all this, stay
with the chords of the C Major scale and keep your melody to the white notes
while playing with these progressions.
And remember that you can't be more than one note away from one that will work for the chord you are playing
So have some fun. It won't sound bad, I promise.
An Article from Mike Head Chord Theory & progressions.
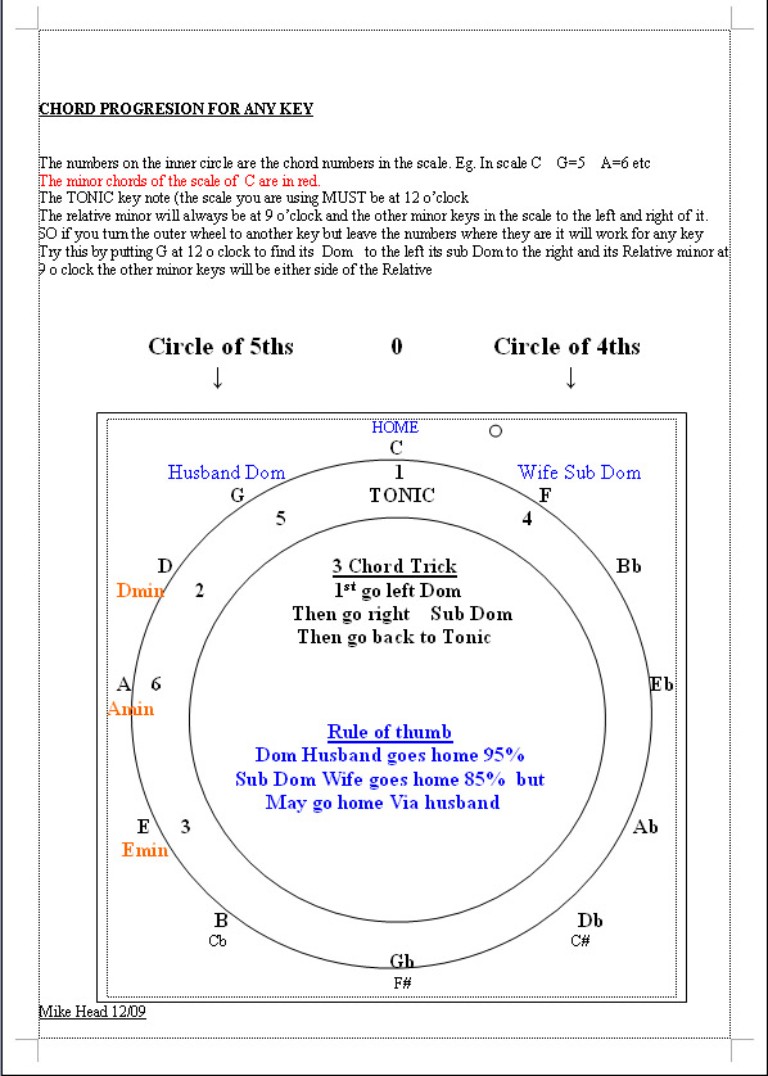
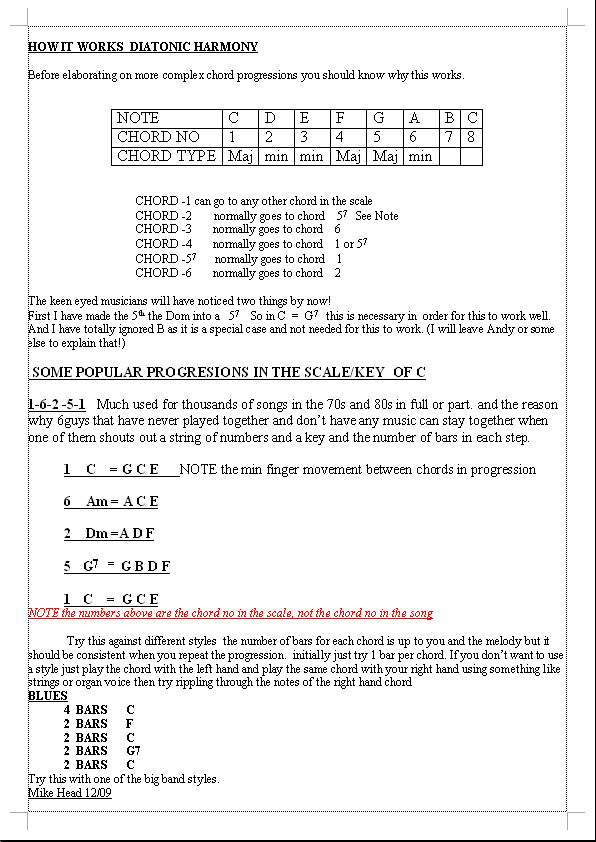
SOME FURTHER THOUGHTS.
The charts will work in any key by turning the outer disc to bring the TONIC (KEY NOTE ) to 12 o clock and using the chords from the new key/scale. EAR Players, often say that the hardest chord to find is the second one of the song.
This is because as you can see from the Diatonic Harmony
chart the first chord can lead to any other chord in the scale.
However, once you find it, you are on a run, because after
that it is very likely to follow the route in the chart back to home.
Eg: If playing in C and the second chord in the song was No6 Am, then by working back round the wheel or following the numbers in the chart you would go home via 6 goes to 2 Dm 2 goes to 5 G7 5 goes to 1 C.
TIP:
If you form your chords in the inversions shown in the chart below you will find you have minimum finger movement through the progression, at least one or 2 fingers don’t have to move between chords.
You can of course use single finger chords but don’t forget to make the Dom 5th a 57 =G7 in C.
So try this on a nice organ voice. Play one or two bars of each chord Style Optional.
First chord 1 C
Next chord 3 Em then walk back round the wheel to home 6Am 2Dm 5 G7 1 C.
Some More Thoughts On Finding Simple Chords
Trying to de-mystify music.
Almost as soon as you pick up your first keyboard book or some one starts to teach you .
You are told that you can make a chord from a note by adding the third and fifth interval (note)of that scale. The Triad
So C +E+G = the chord C if you carry that on through the scale of C you get the chords.
C Dm Em F G Am Bdim C in their root position.
It doesn’t take a genius to spot that in fact this is every other note (cool what) see chart below.
So, if you ever forget how to make any of these chords simply take the root note miss one play one miss one play one. It will be in its Root position but it will be the right chord .
Inversion.
Sometimes it is more comfortable, and makes it easer to move to the next chord without moving the whole hand, to invert the chord.
Just take the bottom note and move it to the other end on the third move you will be back where you started.
CEG = ROOT Position
EGC = FIRST Inversion
GCE = SECOND Inversion
Now the awkward squad.
You will have noticed when you get to B using this simple triad of first third and fifth we finish up with a chord called Bdim don’t worry, from the chart you can see that this is Notes B D F.
However if we take our old favourite G in its Root position G B D and add an F it becomes G7 this chord contains within it the notes of the Bdim chord and the notes of the G chord.
G B D F how cool is that, 2 for the price of one.
And that is why one of the first three chords you learn is G7 because with C F and G7.
You now have enough chords for the three chord trick in the key of C as you have a chord to go with every note in scale.
If you are new to all this and still using single finger chords on a Yamaha Keyboards.
Don’t
forget to play the black key immediately to the left at the same time as the
note for a minor chord or the white note to the left for a 7th, otherwise
you will get all Major chords and that won’t be right for playing in the
Key/scale of C as you can see from the chart.
Root inversion chords in the scale of C.
|
Note |
C |
D |
E |
F |
G |
A |
B |
C |
|
Third |
E |
F |
G |
A |
B |
C |
D |
E |
|
Fifth |
G |
A |
B |
C |
D |
E |
F |
G |
|
Extras 7 |
|
|
|
|
F |
|
|
|
|
Name |
C |
Dm |
Em |
F |
G7 |
Am |
Bdim |
C |
|
|
|
|
|
|
|
|
|
|
COOL. Every other note !! You just can't forget that so if you are ever stuck trying to remember the notes for say Am A miss one C miss one E A C E = Am root inversion.
For Less Hand movement between chord progressions try:
NOTE the minimum finger movement between chords in progression.
1 C = G C E
6 Am = A C E
2 Dm =A D F
5 G7 = G B D F
1 C = G
C E
Many Thanks to Mike for allowing me to Host his Article.

|
Chord progresion Mike.doc Size : 46 Kb Type : doc |

|
chordie.zip Size : 131.574 Kb Type : zip |
A beautiful and simple Chord Explanation Program - Chordie
CHORD SUBSTITUTIONS
Chord substitution refers to the art of changing and/or adding chords to a progression in order to create harmony that is different and more interesting. The general chord substitution rule holds that chords that share two or more notes in common can be readily substituted for each other. Substitutions that share two or more notes in common are referred to as a common tone substitution. Any chord substitution must sound good and your ear is always the final arbiter of acceptability.
Examples of frequently used common tone substitutions.
Original chords : C ( C E G )
Substitution chords : Am ( A C E ) and Em ( E G B )
Original chords : F ( F A C )
Substitution chords : Dm ( D F A ) and Am ( A C E )
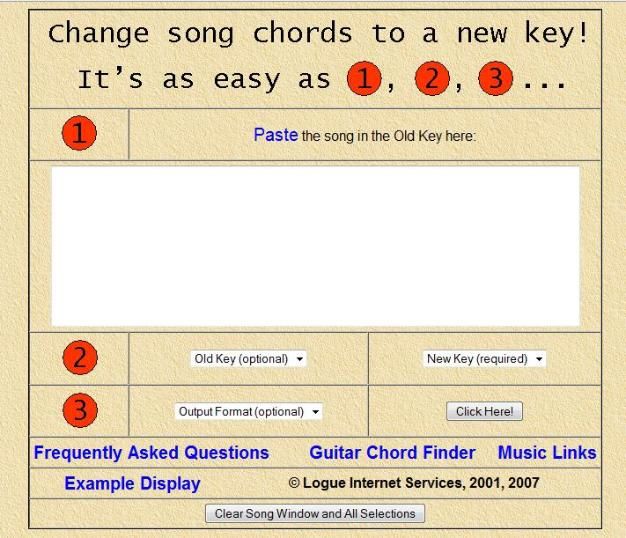
A very useful site for transposing Chord and Lyrics Sheets
