NEW HELPSITE: TYROSTIPSTERS
New Website opened for help to Tyros Users and I have no hesitation in recommending them... TyrosTipsters HERE
Import a wav song to T3 -added 02/03/2012
When you put a USB stick into the keyboard a 'wav' file does not show on a tab (like it does when you are loading a style or registration from the stick). Instead look for 'Import wave' (it should be on button 7 under the screen. If not then press 'Change menu' on button 8. When you have does this you will be able to see the USB stick and the wave file you want to import, select it and press 'Import' on button 6 under the screen. This will then transfer the wave file onto your HDR and you can select it as you do any other song file that you have recorded and saved to Tyros.[TL]
Ensure that the wav complies with the below frequency:
.WAV
44.1 kHz
16 bit (64kbps/channel)
stereo
Import wave to Tyros 2/3
Select an empty voice slot from the Expansion Voice Bank to Right voice 1.
Press ‘Voice Creator’ button, press ‘Wave Import’
Press [A] Element 1 (this will be an empty slot named Element1 ). Press [F] 'Add Wave'
Press [F] ‘File Import’ and highlight the wav file in storage
Press Import [button 6 lower] and OK. On screen ‘Import this file to CI -> Yes!
Button 1 choose Lower or Upper -> this is fixed pitch on any key or variable pitch on each key
Press Execute [H] -> Press ‘Save’ [J] and Assign [L6] -> Name and OK
Import new Wave to multipad
Select the imported wav in the Expansion button into R1 Voice slot
Press the ‘Digital Recording’ button and press the ‘MultiPad Creator’ button [C]
Press ‘New Bank’ [C] Pads will clear. Press pad 1 [A]
(carry on with all same procedure to build a bank)
Make sure that you only have the Right voices that you need lit on the ‘Part Select’ buttons
Press ‘Record’ and play the keys. Press ‘Save’ [I]
Check that the ‘Repeat Pad’ is set to one shot or continuous
Check that 'Chord Match’ is set on or off
Press ‘Save’ [L6] and name -> OK
Press ‘Exit’ twice to come back to screen. Check pad for sound…[kb]
* Please be aware that any sounds you Import to the Custom voice Banks must always be loaded on startup to use these wave multipads
Tyros 4 is the first keyboard of the range to support Flash Memory module for fast loading of Custom Voices (UVN`s) (Samples).
Individual loading of voice and Library loading is much the same as we have been used to. Pack installation of Yamaha voices is an addition which most are now familiar with BUT the one big difference is with the DELETING of any voice that you do not want to keep in your memory or make space for a better one.
You can go into Library Edit and delete the voice in the normal way but on Tyros 4 this will only get rid of the voice and the name, it does not get rid of all the wav elements which are still taking up space on your memory board and may stop you from loading more voices.
These wav elements can range from 1 element on simple voices to 70 or 80 elements on vocals and choirs and large samples.
So having deleted the name of the UVN from its slot here is what you have to do to delete the wav elements....
Press Voice Creator..........Press Expansion Module
Top right of screen...Category must show.."No Category" if it doesnt press button F and scroll to "No Category".
Now you will have a list of all the wav elements against all the UVN names and can scroll down to the name of the Voice you are looking to delete.
Press DELETE....put the red line highlighter round the first element of that voice with buttons 5.
Press SELECT with button 6.....press button 5 to next element and SELECT....and so on until all Wav elements for that name are highlighted in black, then press OK (upper 8 ).
Do not press ALL and make sure you are only selecting for that voice that you want to remove.
Now you have removed all elements for that voice and have freed up space on your Flash Memory without having to Format and reload all the other voices again.
Recording a song in Audio using the 'Simple' Method - T4
Set up your song parameters, when prepared Press the Audio Recorder [Rec] and [Stop] Player buttons together at the same time. The Main Screen will come up with your options to 'Record'. Press the [G] button to Record in 'Simple' Mode then again press [G] (OK) button to call up the 'Simple Recorder' Display.
This will now create a 'NEW' empty Audio file named "S_Audio_***.WAV"
Recorded Audio on Tyros4
When a recording has been done on Tyros4 a file is created with the extension .aud. This file can only be played back on Tyros4.
If you need to convert the .aud file to .wav format, a simple recording file for transfer to a pc, this is what you have to do:
1) Select the desired .aud file on the Audio (Multi) File selection Display.
a] Press the Audio Recorder/Player [Select] button several times to call up the desired Audio File selection display (Audio (Multi), Audio (Simple) OR Playlist.
b] Use the TAB [<-][->] buttons to Select the location (HD or USB). You can also select an Audio file by using the [Data Entry] Dial, then Press the [Enter] button to Execute.
2) Press the Audio Recorder/Player (Setting) button to call up the Multi Track Recorder.
3) Press the [J] (Mixdown) Button to Convert to a .wav file. Press the [J] Mixdown button to call up the Mixdown display.If necessary press the [B] (File name) button, change the file name and then press the[8^] (ok) button. If necessary press the [C] ( Save to) Button, use the Tab [<-][->] and [A-J] buttons to select the destination for the converted file, then press [8^](OK) button. Press the [G] Start button to start playback - As soon as playback is finished conversion will take place from .aud to .wav.
Press the [Exit] button to leave the MultiTrack Recorder Display.....
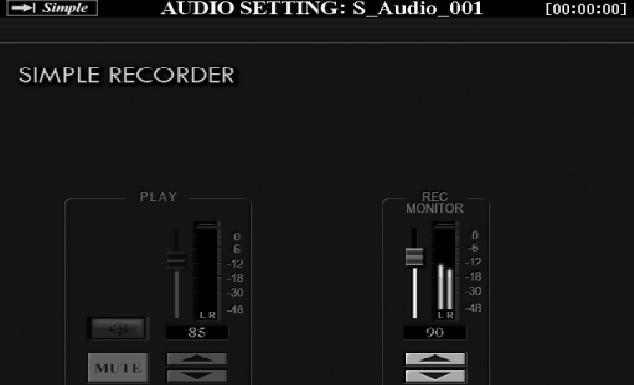
Before actually recording the song, check the recording levels on the 'rec Monitor' Meter by playing the media to be recorded ie, midi file, style etc. - Adjust as necessary by using the [6 up/down] buttons or Sliders. Adjust the volume so that it doesn't constantly enter the Red area ( I would suggest set below '80' so that no clipping of sound is created). When ready press the [Play/Pause] button to start the actual Recording sequence.
When done press the [Stop] button to end the recording process.
Press the [Exit] button to leave the Simple Recording Display.. TIP: Record your song to 'midi' first using the onboard Sequencer, you will have the option to edit the file before final Audio Recording if necessary.
[NS] Changing OTS Settings in a style...
Changing OTS of a preset style means creating a
User Style that will have to be saved to the User area, Hard Drive or
Floppy/Memory Stick. We are not altering the intro`s, rhythm or
endings, just the preset voices on R1 R2 R3 and/or Left. You
can, and we will use the User section to save the new Style to, but if
you have a HD fitted it is best to first make a folder on your HD called
User Styles or similar ready to save these altered styles to and
therefore keeping the small User Section as a workbench.
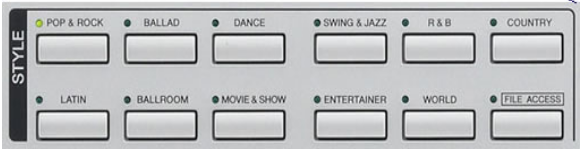
Right, lets get started. I am going to work with the E.P.Ballad style, but you can choose any style.
1. Press Ballad button on style section and select E.P.Ballad. OTS 1 will show you that
only Right 1 voice is lit in "Part On/Off" and on screen you will see that that is SA Saxaphone.
(will be different on some keyboards but that doesnt matter).
2. Press the "Part Select" button for Right 1 so that it is green - SA Saxaphone is now highlighted
on screen.
3. Press "Piano" button in voice section (or any voice section you want any voice from) and select
Warm Grand. Exit to main screen. Your new voice has taken the place of
SA Sax. (You can select a new voice from User, HD or Custom Banks.)
You can also press the "Part Select" button on each of the other right voices and the left voice and
change them in the same way.
4. At this stage I try the voice. A nice warm Piano, but after a phrase or two I may want some
harmony and/or a Choir backing to come in. Press the harmony button and try it. If you
want something different or fuller then press Function - Harmony (F) and adjust it. When
happy exit to main screen.
5. Press "Part Select" on left voice - press "Choir" in voice section, go to page 1 and press `G`
to select Gothic Vox. Exit to main screen - press Left Part On/Off button so that it is lit.
Try it. You now have the option of a single Piano, harmony Piano and or a Choir backing.
6. Whilst trying out the sounds you can alter the volume balances on the main screen (upper
5,6,7,and 8 ) to suit. Also any multi pad can be put in at this stage by pressing `E` and going
to wherever you have your favourite stored.
7. Now I am going to cancel the left part by pressing Part On/Off button and also the harmony
button as I dont want them to come on when I initially start the song. I can put them on during
the song as long as they are saved there.
8. Now it is time to Save my prefered OTS 1.
(a) Press Memory button. You require ticks in........
Style Harmony
Voice Tempo
Multi pad
The rest are optional depending on whether you have settings for them or not and they can
be saved in the registration memory anyway. I usually have them all ticked except for HDR
and Line Out at this stage.
(b) Press OTS button 1. Screen will ask you to save current style or changes will be lost.
Press F (Yes)
This takes you to User page. Now you can save here or tab to your HD folder or Memory
Stick/floppy disc to save.
For ease of this tutorial we will save here to User Page. It can be copied and pasted later
before attaching to a Registration.
(c) Press SAVE (lower 6) - now you see the name E.P. Ballad (or whatever style you are
dealing with) You can add a number or letter to it to distinguish it or give it a song name
or anything you like.. Once ready just press OK.
9. You now have a User Style saved. The process for changing the voices in OTS 2,3,and 4
is exactly the same. Just press the Part Select for the voice you are changing and go to the
voice and highlight it. You can set all three voices on Tyros and both voices on other board
with their different volumes and other settings. Just remember to save each OTS before
going on to the next one. Remember each time you Save, you save to the same named
Style and answer Yes to the overwrite question.
You now have an E.P. Ballad that has totally different voices to the preset one and once you
have put it in its permanent location, it can be allocated to a registration button and Bank.
Looks complicated? No its like anything else.....practice a few times and it becomes easy.
Edit. Since this tutorial was compiled, page numbers and voice
positions have changed on some machines. Don't let that worry you,
just pick the voice that you want from whichever page.
There are several ways open to you to edit midi files/recordings. This can be achieved both on the pc and on the actual keyboard.
To mention 'minor edits' and the assumption by singular notes being incorrect and this can quite easily be rectified.
On the pc this can be achieved by loading the midi into a sequencer program such as Cakewalk Sonar etc.
SONAR HERE
The notes can be individually manipulated/changed in such a program.
There is also a very good program specifically called 'GNMIDI' that will do most everything to do with midi.
GNMIDI HERE
On the keyboard you can edit the midi in the onboard sequencer and perform the same operation as a pc sequencer although more limited but perfectly acceptable for minor changes.
Load your midi file
Press Digital Recording button
Press Song Creator button
Tab across to the 1-16 page and you will see all the individual notes recorded in the song
Press the a & b buttons to scroll up and down the notes
Find the note you wish to change and then press the applicable note key - this will change that note in your sequence
Do the same for all notes to correct/change
OR:
Press the sequencer button to play through the song and find the bum note and stop and then do as above to change..
When done 'save' your changes to the song.
Saving EQ Parameters on Tyros [All]
Press the keyboard Mixing Console Button. Set all your parameters on the different pages and then tab to the CMP page where you also have the
option to turn on or off the compressor and press 'save [Button I]. [I would recommend turning the Compressor on for a much clearer defined sound on the keyboard]
You then have the option to save as User1 - 5. Any will do.
Saving Style Variation Changes to a Registration So That the Fill-Ins Work
When making a Registration that changes the variation (E.g from Main A to Main B), the fill in does not play as it does when doing this manually.
To get the Fill-In as well, press the Main Variation button twice so that it flashes, then save to a registration button.
Remix a midi on Tyros
Q] Is there a way to re-mix a midi song after it has been recorded on Tyros? I found the sliders excellent and it would be good to use them to record the volumes,etc after you have recorded the notes!
Nigel
[A] You can re-mix and save a pre-recorded midi song. "I was sorting through a bunch of generic midi song files and found I could get pretty good results in certain settings within Song Creator and re-saving the midi file with your optimized setting that would render fairly well using the score screen. Having recently posting a question regarding making permanent changes to a midi song file, I realized I could save the midi settings in more detail including your score setting.
When using the score screen under 'setup' certain midi files provided satisfactory scores that I could follow and play by activating what midi channels are displayed for Right Hand (Treble Clef) and Left Hand (Bass Clef) as pointed out earlier in this thread. It would be good to just load up and display your midi song on the score screen without having to do anything. After I got all the voices, volumes, and settings to my liking including any changes within the score setup, all these settings including the score setup can be saved with the exact LH/RH channels displayed. Next time you play the midi song from your user folder your score screen is instantly setup to your saved settings without having to fool around with it each time you play a different song including chords, lyrics, and score size. You can also make other midi song changes within a computer program as well and reload the file into the Tyros. -> To save all your Song changes in Song Creator you must make sure your song is at the beginning -> go into the Channel tab.-> use your A & B buttons to highlight 5.
SETUP
- make sure the voice, filter, EQ, volume, effect, pan, tempo on the bottom are checked on.
- in addition, to save your score settings check on "score setting" and "Lyrics setting".
- you can also check on keyboard voice, guide and mic settings.
- press EXECUTE and then SAVE. -> this overwrites my old midi file with the new changes including your score screen to your liking.
I hope this helps all."
Regards, Mark [YPKO]
MP3 Playback on T4
Load your usb stick with your mp3 files and then Press the select button on the RH recorder with your loaded USB-drive inserted on T4, you will then be able to transfer them to the HD and load them into the play-list from there. Once there you can either select single files or Select shuffle mode and then press play. It will then play random songs continuously. [Pete]
How to - Registration Banks
You
can use an existing Registration Bank and Save to a new name and then
'Edit' that file on Tyros. Copy a Registration and save it to a new name
'Blank' for example, Press 'Edit' on the Screen and then press
'Delete' and ALL and 'Save'. All the original Registration Buttons will
now be unlit..Your own 'Blank' Bank.
OR: Turn your keyboard off, then whilst holding down the top B note, turn it back on.
You now have a blank bank to name as you wish. Now this can be used every time you want to make a new bank.
How can I name the Registration Buttons
Press the Registration button [j], when at the Registration Screen depress the 'Edit' button [lower 8]. There you will see a 'Name' button [lower 1]. This will allow you to change the name of each individual highlighted Registration button in that Bank.
Creating a 'Gig' folder.
To create a System Setup file (Backup)
To create a system setup file firstly setup up all the keyboard parameters needed, then gone to Function/Utility/System Reset,
push System Setup Files, tab to User, name the file and then push Save...
Loading Style Links to the style bank buttons:
Press button
[J] and then Press button [G] to nominate the styles in this Folder, THEN again press button [G] to confirm. -> Press the Style Bank 'File Access' button -> Press the Screen 'Memory' button [E] -> Finally Press the Style Bank button where you wish to link those styles to.
If the 'File Access' Button is not illuminated when you then you press the Style Bank Buttons you will go to the Preset Styles as normal. Press the 'file Access' button and by pressing the Bank buttons you linked to, those styles will now come on Screen.
How to - Setup a twin set Tyros (1/2/3/4) + NP30 Midi Setup
Tyros. Function \ Splitpoints. Set Split Points R1 & R2 to C1.(last key left) R3 C1#. Previous Registrations saved may alter this.
NP30 Midi Out to T2 Midi In A. Only one lead required. (Midi IN B could be used)
Tyros. Function \ Utilities \ Midi \ Edit.
Page to System and set Receive Transpose to ON.
Page to Receive and set CH1 from Song to LEFT.
Page to Chord detect Tick CH1.
Volume Control of NP30 is OFF as it's acting as a dummy to trigger Tyros Chords \ Styles.
The Midi Template settings above Save As (name ?) Suggest Lower ON into USER.
I did another Template leaving Receive CH1 to Song and Saved As Lower OFF into USER. This enables you to switch off Tyros left voice if not required as on the Tyros left voice switch does operate on this setup when playing from NP30.
Additional NOTE. Normally the TwinSet NP30 would be playing chords around middle C as per Organ.
The NP30 can be transposed one octave down by.....
Holding Grand Piano Button down whilst pressing C4. This now plays the Tyros Left Voice -1 Octave [Thanks to GrahamUK]
This can be easily found by pressing any Voice button on the keyboard -> on screen press button 8 'UP' -> press button 2 for page 2 -> press button 'J' to open the 'Legacy voice Folder'
How to activate 'song Re-voice'
Press 'mixing Control' button -> Tab across to 'Vol/Voice' -> Press button [F] 'Song Auto Revoice' on.
These instructions can be followed purely at User Risk, although, if carried out correctly there should be no problem if the Dimms used are suitable for T3. Similar process for T2.
There are two slots for extra memory chips, referred to in the documentation as DIMM's. Should you need to insert extra memory, refer to the manual or your dealer to ensure you buy the right kind, it's important. Dimms should be installed in matching pairs up to a maximum of 1 Gig Total. You cannot install only one module and leave the second memory socket empty. Yamaha recommends that you purchase DIMM's that conform to the JEDEC* standard. Use only 168-pin DIMM's of 64, 128, 256 or 512 MB capacity (synchronized DRAM (SDRAM); PC100 or PC133). Use only DIMM's that have a height 38.2 mm or less. [purchasing DIMM's, make sure that the DIMM design does not utilize more than 18 memory chips per module. (DIMM's comprised of more than 18 chips do not operate correctly on the T3 or T2)]
Amazon have suitable Dimms on sale here: AMAZON
To Install the Memory Modules:
With the bottom of the instrument facing you [I did mine on the Bed], go to the centre of the entire surface area. Slightly to the right of centre. You will find a flat metal plate with 4 screws securing it the the Base. Remove these screws and gently lift the plate out taking care not to drop the screws into the underside. Having removed the plate you will see two memory module slots, just like those inside a PC. You fit the memory chips in exactly the same way. They will only fit in one way!
Note: When inserting the chips - look at the slots and match them with the Module before insertion. Whatever you do, don't use excessive force when pushing the chips down into the slot, if correctly inserted the securing clip's at the end will automatically rise and clip in to place against the end of the module to secure it in place. Replace the plate and screws. Power up the keyboard...
To check the installed Memory.
-> Press 'voice Creator' button -> [Button B] Library edit -> [Button 8 lower] Property.
The amount of Memory installed will show. If not, then there are 2 possible reasons, somehow you have managed to slot in the modules incorrectly or the Modules are not to Yamaha Specification.
There is a feature of rhythm breaks which can increase the number of variations.
To make rhythms as interesting as possible, try including regular breaks rather than allowing the same variation to trundle along too long. You can hit the break buttons at different points within the bar instead of only at the beginning. It is possible to get 4 different break patterns by hitting beats 1,2,3 or 4. Often a simple 1 beat break sounds effective by hitting beat 4 in a bar.
Shortcut to the Utility Screen
Press the 'Direct Access' Button and the 'Demo' Button together. This will take you directly to the Utility Screen.
How do I install a music finder file?
Depress Function/Utility/System Reset Tab and use the button on the right side of the screen.
Press the 'Direct Access' Button and Left Hold Button on 'Part Select' together to access the Split point Screen.
How to - To access and see the HD Mode on Tyros
Connect your a-b usb lead from Tyros to pc and then Hold down the Music Finder Button on Tyros and turn on. Go to 'My Computer' and you will see the Tyros HD.
How to make the Tyros play bass like an organ with a floor pedal.
To set the foot pedal, depress Function
(left of screen), then Controller , select Pedal tab with the Next button (to
right above screen) if necessary, then use button 1 below screen to scroll down
to the Bass Hold setting. Check that the pedal polarity is correct and that's it!
How can I determine the amount of user memory used?
Select Styles, then User and then View and then Property, it will display the amount of free area.
How to - Save Mic Settings.
1) Setup the instrument so that the only way Mic settings can be changed is manually, i.e. not by a song or style. To do this: Function/Utility/Config1 Tab and scroll down using buttons on left to parameter lock. Make sure that Mic (and other settings you want to 'lock' until you change them) is checked. Depress the Exit button to get back to the main menu.
This setting is saved in the Setup file that is loaded every time you start your machine. If you do a system reset, then this file will generally revert to the factory default and you will have to make the changes again or load a Setup file that you have stored with your settings. To save such a file, after making your changes go to Function/Utility/System Reset and using the buttons on the right side of screen, depress system setup, then Next to User (or HD or Floppy), then Save, and then use a new file name. Do not take the default, as it will only confuse you later. To load a file, go to Function/Utility/Reset and then Next to the location of the file and double depress the button next to the file name.
2) To set the Mic reverb setting to 0, depress Mic Settings/Talk Settings Tab and set reverb depth =0. Depress Exit repeatedly to get back to the Main menu (otherwise, the setting is not stored in the setup file!). This setting should be there until you change it or do a system reset.
How to - Save vocal harmony settings.
There are 2 possible methods:
1] Saving and recalling via 'Function/Utility/User Effects'
and
2] Saving a Registration with the mic settings checked
How to prevent loss of pedal and mic and other settings when power is turned off.
Mic and pedal settings are not saved by Default and you must save the information to a Registration. Create and Name a new Registration with an easy memorable name. When the keyboard is first turned on select that Registration and your saved Settings are then saved for that Session.
Left Voice Freeze Out.
What I wanted to do is 'freeze' the 'left' voice when the Auto Accompaniment is on : 'running'. The good news is that I recently found out that the Tyros in fact DOES allow you to accomplish this. This is how it's done:
1) Select (checkmark) only the style parameter in the 'Freeze' Pamameters Window. Be sure to leave the Voice parameter unchecked.
2) Turn on (activate) the Freeze button.
After performing the above, you can then select any style and any of it's 4 OTS registrations and all OTS voice setup's will change EXCEPT the 'Left' voice. [Scott]
Tips and tricks to enhance performance.
1. Playing any three adjacent notes
simultaneously below split point on the keyboard stops all style
sections except rhythm [you have to be in 'fingered mode' for this to work].
2. Hitting the button of the main section which is playing at any time brings in a fill.
How to - Set up splits on the keyboard.
To do this Press function on the keyboard and select Button 'C' 'style setting/ 'split point'/Chord fingerings' on the screen. Tab to 'split point'. You will see it is set
to your normal split point position. On the right of the screen you will see L+R S
L R - Press R and hold down and then the note where you need the split to be. You will now see
the screen is showing aTyros Keybed picture with three steps marked S & L, S[Style] L R. Can now be saved to a Registration if that is what you want to do.
How to use P.A.T?
If you load and play a song that has XF chords (e.g. the ones in the Preset Area, quick records made on the instrument, XF files downloaded from Yamaha, or standard midi files that have XF Chords added by the program PSRUTI), and the PAT button is depressed, you can play along with the song using the right hand and it will select only the notes that sound well with the song. You can not play a wrong note as Tyros automatically picks up the structure of the played Chord and places notes suitable to that Chord in the song.
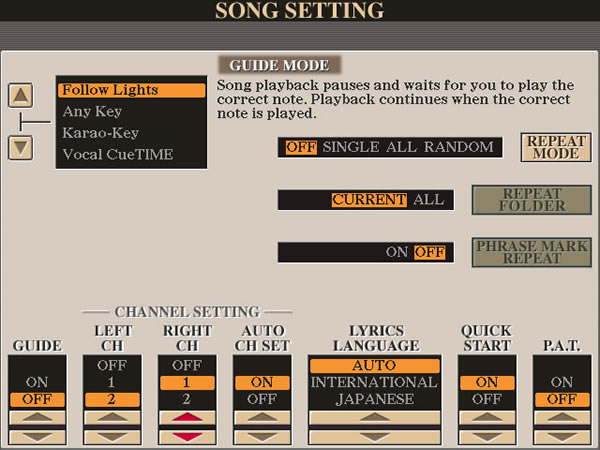
EXPLANATION: With P.A.T you can play any midi file that has XF Chords written into it [From Yamaha] and get a result playing your right hand melody. Ordinary midi files that you download from the web can have these Chords written in to them using a program called psruti from Heiko Plate. You can obtain the program for Free from http://psrtutorial.com/util/plate.html
Now on with the Show - Load in a Demo song on the keyboard. -> To access P.A.T Press the Sequencer Stop button and Direct Access together - This will bring up the Song Settings Screen. To the bottom right of that screen you will see the P.A.T with an on/off switch toggled by the No 8 button below screen. Toggle P.A.T to [ON]. Press 'Play' on the Sequencer and start playing anywhere on the keyboard with your right hand to create a new melody. No matter what key the midi is playing in P.A.T will pick up the XF Chording and play only suitable notes for each Chord played.

What is the mfd (MusicFinder) and how does it work?
The mfd is a listing that associates style, tempo, starting intro and next section values (which do program the instrument) and song names, genre, time signature and keywords, which are just text and do nothing to the instrument's setup.
The styles have to be in the Preset or User area. The OTS and other characteristics are all determined by which style you select.
The mfd is stored in the instrument in the form of database records which are a part of the style. When you do a factory restore, it scans all the Preset styles and rebuilds the listing.
If you add a style to the user area that has a database record included, then this data is added to the current listing. If you add a data base record using the edit function in the PSR, then the data is added to whichever style you specify.
You do not have to keep the "factory" or default entries. The easiest way to create custom lists is with the programs MusicFinderView or the MFD Editor (requires Excel). Use only preset styles when creating mfd records on the PC. While it is technically possible to reference styles in the user area, it is not recommended
If you want to use user styles, then add the mfd record for these in the instrument. This will cause the data to be included with the user style. This style can be saved outside the PSR and it will automatically be added to the mfd listing whenever the style is reloaded.
How to - Save a MusicFinder File?
Use Function/Utility/Reset on the right side of the screen to save the mfd file. Use the Save and not the Copy button.
How can I make copies of preset styles?
Depress the Style Button then style group you wish to copy (e.g. Folder name?) Can also be done with single styles and those styles can be renamed to suit a particular song if you wish
Select Copy, Depress All, then OK. Depress Next until you get to your media, then Paste onto the media
How to use Mixing Console to edit a style to
mute a part.
[user styles only as presets can't be altered unless copied elsewhere - User/HD/USB].
1) Load the style
2) Depress Mixing Console until it displays the style page
3) Depress J (on Tyros) and the button below the screen to turn volume of the part to 0
4) Depress Digital/Recording/ Style Creator then Next and Save
How to copy all four OTS from one style to another.
You can transfer 4 OTS by saving each one to a Registration and then proceed by pressing Keyboard 'Function' Button -> Freeze. Tick all but the 'voice' Button. Exit. Load in your chosen style and depress the keyboard freeze button just above the Registration Bank. Then Reg 1, Press Mem and Reg button 1. The same for the other 3 OTS and finally save the Registration
How to change a style’s beat.
To change from 4/4 to 6/8, the settings in Digital Recording/StyleCreator/ Groove should be: Original Beat:16 Beat converter:12
How do I play just the bass line from a style?
1) Load the style
2) Push On/Off until the style parts show across the bottom of the display.
3) Press and HOLD the Bass button below until it says Solo.
Now only this part will play.
To save a version of a style with just the Bass part, start Mixing Console and depress the button until the style page appears. Turn the volume down for all but the bass. Digital Recording/StyleCreator/ assembly tab and depress Save.
How to Quick Record a song (midi sequence).
1) In the Song section (top left), depress Top and Rec at the same time.
2) Depress Rec. This will allow you to record the accompaniment and the right
hand part.
3) Start playing.
4) Depress Rec when finished
5) Depress Top to rewind and Play to hear your recording
6) To save, Depress Rec and Top again. The PSR will ask you if you want to save the file.
Using Mixing Console to set up voices for sequencer recording.
When recording from the keyboard to an external sequencer, Yamaha recommends using the Mixing Console to setup voices, effects, etc. Then open the midi in the sequencer and multi track record to measures after the setup commands put there by the PSR. For this to work, you must have at least some note data in the track before you edit the setup in the Mixing Console. You can not 'setup' and empty track. I ensure this by starting with a type 0 midi that I made on a sequencer with one note in each channel, 1 to 16.
After editing each track in the Mixing Console, depress Top, Open Sound Creator, depress Next to the Channel Tab, and button B to the fifth item, Setup. There you will see a list of items that can be recorded to the song any time that you depress the Execute button that is shown on the screen.
Firstly, make sure that Voices, Effects etc are ALL checked and then press the Execute button. It should then indicate that it is recording your changes.
Tips for making pitch bends..
(1) Always set pitch bend range to 2 semitones
(2) Good expressive effect for sax and brass voices is to "bend up" to the attack of a note. This is done by pulling back the pitch bend wheel just before the end of a bar and then simultaneously hitting the next note and releasing the pitch bend wheel. With practice, you can vary the speed of releasing the wheel and the exact position of when you hit the note.
(3) I always tend to "bend up"
to notes, as you know where you are going to end up! For example in a guitar solo I emphasize the
first note in a bar by hitting it early (in the previous bar but with the pitch
bend wheel pulled back and then bend up to the point in time where the note
should begin... make sense? Sometimes I
will bend up or in country sounds; I apply a very light touch on the bend wheel
to guitar sounds to chorus the them. [Simon Williams SVP]
Back up Tyros
To USB Stick, Copy each section one by one, Regs, styles, pads and then Paste to the USB Stick.
To pc, Connect the usb a-b cable with Tyros switched off then, keep pressed the MusicFinder Button and switch Tyros on. When
the Display shows, USB Mode, let the Button go. Open My Computer, and
the Tyros Hard Drive will show as a new drive letter, to edit as you wish.
How to install an ins [Instrument Definition] file:
Open Cakewalk.
Click Tools/Instruments (Options/Instruments in Sonar 3), then depress the Define button.
Click the Import button, then go to the folder where the ins file is stored, and select it. Click Open
In the "Pick One or more Instrument.." screen, click the ins file (select it). Click OK ( This is where most people go wrong)
Click Close and Close again to get back to track view.
With instrument definitions installed, click on Tools/Instruments, select all channels in the left hand box and then click the name of your instrument in the right box, and then OK.
Back in track view, double click the bank box for the track that you wish to modify. Make sure that the bank select method is Normal. The instruments are organized into banks. Panel voices often are in Bank 112. Midi voices are Bank 0, special effects are in Bank 16128, and drums are in Bank 16256, the last one in the list. Individual instruments are selected in the patch box.
To change the bank without instrument definitions, in the Track View, double click on the bank box. Then enter the bank number determined by the formula 128* MSB + LSB. Place the program number in the patch box.
Important note: When Panel voices are selected in the instrument, they automatically set up DSP effects. This is NOT true when Panel voices are selected in a sequencer of PC program such as MidiPlayer. For many Panel voices, the difference might not be material, but beware. Voices such a WahGuitar will not sound correctly!
Load uvn's on Tyros3 Step by Step Guide -06/12/10
R1 Voice on ->
Press Voice Creator button ->
Press Individual Load ->
Tab across on Screen to you storage media USB ->
Find your voice(s) and press 'copy' ->
Tab back to HD and press (lower 7) 'Folder' and create a new folder for your voice(s ->
Open that folder and 'paste'(Lower 7) the files into it. ->
Press Exit once ->
Voice Creator Screen - Press Individual Load button and navigate to your new Folder on the HD and press open ->
Select a voice and your expansion voice Banks will appear. You can put that voice into any free slot or overwrite a voice you may not like ->
Press the 'Assign' button (Lower 5) -> OK
You will now be able to access and load that voice via the Expansion' voice button.....
The same applies on T2&4
As a PS. I load in my voices this way with created folders on the HD as
the assigned voices will be picked up from the HD where stored and NOT
the USB if a straight load was used. I like to keep things tidy. If
loaded directly from the USB and assigned then the same USB Stick would
have to be inserted every time Tyros boots up to find those voices.
Load uvn's to Tyros 4 [update - BrianBlue]
How to load a TVN T2/UVN T3 file to the Custom Voice Bank.
Use HD Storage to move the file to the TVN Voices folder. Install in current bank with Voice Creator/ Individual Load.
How to load a wav file to the Custom Voice Bank. -> Use HD Storage to move the file to the Waveform Files folder. Install in current bank with Voice Creator/ Wave Import.
How to export a Custom Voice. -> Copy the file from the TVN Voices folder with HD Storage Mode.
How to avoid the long Custom Voice Loading time in Tyros 2/3.
1) Push Cancel when the load starts [You can't make any keyboard edits/saves when Custom voices are loading]
2) If you want a fast loading time, and seldom use the Custom Voices, then one technique is to create an empty Library file and use it for normal activities and only load the one with the working voices when needed. Here is how:
a) In Voice Creator, use Voice Bank Edit and delete all entries.
b) Use Save Library file to save this with a new name. I called mine Empty.
c) Load "Empty". Now when the machine is powered up, it will not load any voices.
When you need Custom Voices, Load your previousely saved 'Library' if you have one previousely saved.
* To copy and save a UVN from the custom bank - go to Voice Creator / Library Save, highlight the voice(s) and save to USB or HD.
What are the preset and custom voice extensions in Tyros.
VCE : Normal Voice Files
LIV : Live Voices
ORG : Organ Flutes
SWV : Sweet Voices
MGV : Mega Voices
SAR : S.Art Voices
CLV : Cool Voices
LDR : Live Drum kits
DRM : Drum Kits
----------------------------------
The Following are the Voices in the Custom bank [These are the Links to Voice Links to the Main Custom Voices(the Tvn-Voices)] :
CVN : Custom Voices
CVD : Custom Drums
-----------------------------------
The Following are the Voices which are loaded in the Custom bank (These are the Main Custom Voices) :
TVN : Custom Individual Voice
TVD : Custom Drum Voice
TVI : Custom Voice Library Voice
----------------------------------
Note
Note: The Custom Voice used in T3 is UVN
Hints on getting started with Tyros.
Depress Exit repeatedly to get back to the main (top level) menu.
To do any action (load, save, etc), first select the Object of the action (style, Multi pad etc) on the Main menu. Pick the actions from the screen options.
Always save a registration after you set it, otherwise it will be lost when you turn off the instrument or load another registration.
Depress Mixing Console repeatedly to cycle between Style, Panel and Song. You have to use Song or Style Creator to save any changes made in Mixing Console to a song or style.
To record a song, depress Rec & Top together and then Rec and Then Play. To stop recording, depress Stop and Rec again. The easiest way to save a song you just recorded is to press Rec & Top together.
By default, changing styles will cause the split point and fingering mode to change. (Click Direct Access & Accompaniment to modify). To prevent this, go to Function/Utility/Config 1/Parameter Lock and place a checkmark beside Split Point and Fingering.
How can I keep keyboard settings (e.g. split point) from changing?
Depress Function/Utility/ Config 1 and scroll down to Parameter Lock. In Tyros, there are settings for:
Fingering type
Split Point
Master Eq (the only one that is on by default, I am not sure why)
Reverb Type
Rev+ Chorus + DSP return level
Mic settings
Checking these boxes means that the only way that they are changed is manually via the menus. No longer will changing styles switch the split point, fingering, etc! Caution: the lock setting applies to changes that might be made by Registrations. If you want the Registration to change DSP settings, be sure to leave it unlocked.
How do I check which OS is on my keyboard?
To check the Tyros OS version:
1) Depress Function /Utility /Owner tab
2) Hold down the Owner Name button for 5 seconds and then the OS version will appear.
How to turn off effects.
1) Press [FUNCTION]
2) Press [E] (Reg.Sequence/Freeze/Voice Set)
3) Press [NEXT] twice (Voice Set)
4) Uncheck ''Effect'' for <R1> or any/all voice sections (according to your needs)
5) Press the [DSP] button to turn Off DSP
Now when you change voices, the DSP will not turn on.
How to Defrag the Tyros 2 Hard Drive.
Tyros 2 cannot defrag the internal HD.
If you need to defrag the HD, start up in HD Storage mode ( Press MusicFinder and turn on), with your windows XP PC connected.
Select the Tyros 2 HD in My Computer and defrag from the properties command.
How to control Vocal Harmony?
When you turn on Tyros, the Vocal Harmony light is always lit. To make it default to "off", many users create a registration called Setup and start it every time they turn on the instrument. There a number of other settings that often are put in this registration to ensure a known state after startup.
How do I reset my Tyros?
Occasionally (e.g. sometimes after playing midis of unknown origin) the instrument may sound a little strange. Usually this can be corrected by a system reset initiated by holding down the topmost white key while turning on the power. Other reset options can be found on at Function/Utility/System Reset Tab.
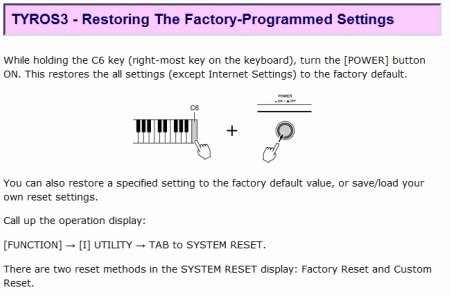
Factory Reset Procedures Tyros3 (psr Tutorials)
Grateful Thanks to Joe Walters for his permission to copy this Tutorial on TyrosMania

This is a very useful Tutorial written by Joe Walters. I certainly wouldn't be able to write this up any better and so I've posted a Link directly to Joe's Site psrTutorials [click on the Image]. Although this Tutorial begins by using Registrations and OTS from psr keyboards, it works exactly the same for Tyros keyboards. Further Tutorials are linked to this page on his Site.....
How do I Contact Yamaha Customer Support?
